looking back at algorithms and data structures which are the backbone of programming..
here is a Merge sort I wrote using JS fiddle:
Thursday, July 27, 2017

Sunday, January 8, 2017
Spring security OAuth2 + spring boot, Part 2
In this 2nd part I made a more complex example to be more practical in real life, and created a web app that is gets its users from db and stores the clients, and tokens in db instead of memory so it's more scalable.
features:
1- users & roles in database
2- oauth related info stored in db (tokens, clients, approvals, etc..)
3- two APIs : a- cats apis, b- dogs api; each one of these can be accessed only if the access token has a proper scope (cats scope and dogs scope)
the app uses h2 in memory database so that it be self contained and no external setup is required
and here is the source code :
https://github.com/blabadi/oauth2lw-parent/tree/master/oauth2lw-client-jdbc
show case:
1- get access token to with scope cats:
a- get the auth code :
go to : localhost:8080/oauth/authorize?response_type=code&client_id=cats-client&redirect_uri=http://localhostcats/redirect
2- login with a user
 3- approve the scopes :

4- get the authorization code

5- exchange the code for a token

6- access cats api:

7- try the dogs api

try to get a valid token to access the dogs api by yourself should be similar to the cats process..
get familiar with the source code, it's only a step up and we only used the classes from the oauth2lw-core we added the jdbc datasource and the token store and passed these to our configures.
features:
1- users & roles in database
2- oauth related info stored in db (tokens, clients, approvals, etc..)
3- two APIs : a- cats apis, b- dogs api; each one of these can be accessed only if the access token has a proper scope (cats scope and dogs scope)
the app uses h2 in memory database so that it be self contained and no external setup is required
and here is the source code :
https://github.com/blabadi/oauth2lw-parent/tree/master/oauth2lw-client-jdbc
show case:
1- get access token to with scope cats:
a- get the auth code :
go to : localhost:8080/oauth/authorize?response_type=code&client_id=cats-client&redirect_uri=http://localhostcats/redirect
2- login with a user

4- get the authorization code

5- exchange the code for a token

6- access cats api:

7- try the dogs api

try to get a valid token to access the dogs api by yourself should be similar to the cats process..
get familiar with the source code, it's only a step up and we only used the classes from the oauth2lw-core we added the jdbc datasource and the token store and passed these to our configures.
Saturday, January 7, 2017
Spring Security OAuth2 + Spring Boot, minimalist working, extendable configuration - Part 1
Hi
been a while again..
today i'm back to write on how to write the simplest possible spring boot app protected with spring security oauth2, but i'll also make the project as a library jar that can be reused for any new projects to kick off faster.
and it will be a simple ready to override functions that will let you focus on configuring only things that you need to worry about without having to worry about annotations or other spring security stuff.
Overview
Spring security oauth 2 has three main components :
a- Authorization server: to handle tokens/authroization codes and user approve/deny
b- Resource server: protects the actual apis that we want to be protected by oauth2
c- spring web security configs to manage users authentication
and as simple as it sounds to get these three in one simple hello world example required hours and hours of searching and debugging dont ask me why..
Pre Requests :
1- you know spring security & spring web security concepts and how to configure it like basic auth or form login
so without further due here are the three classes you will need to get oauth2 up and running :
1- Spring security:
https://github.com/blabadi/oauth2lw-parent/blob/master/oauth2lw-core/src/main/java/com/bashar/oauth2lw/core/SecurityConfig.java
this class extends the Spring web security configurer to allow us to set how we want to protect our authorization server, and to set up our users (Resource owners) store. here it's in memory but in your application you will need jdbc so you can just extend and override this.
by default this protects /oauth/authroize api with the default spring web security login form
when you need to override that form you should override this method :
protected void configure(HttpSecurity http)
and set the url of the login page of your choice using the usual spring web security configs.
2- Authroization server:
https://github.com/blabadi/oauth2lw-parent/blob/master/oauth2lw-core/src/main/java/com/bashar/oauth2lw/core/AuthorizationServer.java
here this configuration server has two main parts :
A- configure(ClientDetailsServiceConfigurer clients)
this method configures the clients of our oauth2 resource, and clients in 90% of the cases in the world of oauth2 represents the 3rd party apps that want to access the resource owner data on his behalf (as example of that is when you allow a web or mobile application to access your instagram photos or facebook friends list)
B- configure(AuthorizationServerEndpointsConfigurer endpoints)
this method let you configure the oauth2 endpoints settings as: where to store the tokens, codes, and many other customizations that are usually not needed (the most important one is setting the token store)
3- Resource Server.java
here we can configure 2 important things
https://github.com/blabadi/oauth2lw-parent/blob/master/oauth2lw-core/src/main/java/com/bashar/oauth2lw/core/ResourceServer.java
1- configure(ResourceServerSecurityConfigurer resources)
this can allow us to configure the id of this resource server (becomes handy if we have multiple resource servers and we have access rules for different clients on each of them) and the more important config is the token store, i.e. where to verify the tokens that we receive in the requests and make sure they are authentic and created by our Authorization server.
2- configure(HttpSecurity http)
this is important and allows us to configure the urls that we want to protect under the oauth2 protocl in this resource, anything we specify here will require a valid token that can access this resource propery and in my default configuration i protected any api under the path /protected to be fully authenticated, now this is app specific configs because each app has its own apis and roles and security rules, so make sure you understand how to use the HttpSecurity builder
it worths mentioning the oauth2 spring libraries provide some exprissions like hasScope() and other security functions related to oauth2 security.
now how to use these classes?
you just have to add this jar in your deps in maven or gradle or whatever and import these 3 classes to your spring configurations, I have made an example in this client project:
https://github.com/blabadi/oauth2lw-parent/blob/master/oauth2lw-client/src/main/java/com/bashar/oauth2lw/client/Oauth2lwClientApplication.java
this is simple spring boot application and in it, just for practicing i overrode the method that configures clients in Authorization server and added my own client.. this can be converted to jdbc or whatever you want
and for the other 2 classes I haven't changed anything so I just imported them as is, if I haven't changed anything in Authorization server I would have also just imported it, but it will be scanned automatically since we extended it and annotated it with @Configration
and when we run the application and as for a protected (although non existing) url like :

so to get a token there are many flows but the more complex and more typical that we would use oauth2 for is authorization code flow, so to obtaina token go to the browser and type in :
http://localhost:8080/oauth/authorize?response_type=code&client_id=trusted1&redirect_uri=http://localhost:9090/redirect
this will redirect us to login page where this is similar to when you are redirected to facebook by a third party app to login and approve its permissions to get some of your data
so we login with our dummy in memory user setup in the spring security configs:

then you get the approval of scopes page


Simple and clean and ready to be used out of the box just get the jar of the oauth2lw-core and drop it in your project and you will have oauth2 security ready.
note that the core lib pom already have the required deps:
org.springframework.cloud
spring-cloud-starter-oauth2
so no need for you to worry about it..
been a while again..
today i'm back to write on how to write the simplest possible spring boot app protected with spring security oauth2, but i'll also make the project as a library jar that can be reused for any new projects to kick off faster.
and it will be a simple ready to override functions that will let you focus on configuring only things that you need to worry about without having to worry about annotations or other spring security stuff.
Overview
Spring security oauth 2 has three main components :
a- Authorization server: to handle tokens/authroization codes and user approve/deny
b- Resource server: protects the actual apis that we want to be protected by oauth2
c- spring web security configs to manage users authentication
and as simple as it sounds to get these three in one simple hello world example required hours and hours of searching and debugging dont ask me why..
Pre Requests :
1- you know spring security & spring web security concepts and how to configure it like basic auth or form login
so without further due here are the three classes you will need to get oauth2 up and running :
1- Spring security:
https://github.com/blabadi/oauth2lw-parent/blob/master/oauth2lw-core/src/main/java/com/bashar/oauth2lw/core/SecurityConfig.java
this class extends the Spring web security configurer to allow us to set how we want to protect our authorization server, and to set up our users (Resource owners) store. here it's in memory but in your application you will need jdbc so you can just extend and override this.
by default this protects /oauth/authroize api with the default spring web security login form
when you need to override that form you should override this method :
protected void configure(HttpSecurity http)
and set the url of the login page of your choice using the usual spring web security configs.
2- Authroization server:
https://github.com/blabadi/oauth2lw-parent/blob/master/oauth2lw-core/src/main/java/com/bashar/oauth2lw/core/AuthorizationServer.java
here this configuration server has two main parts :
A- configure(ClientDetailsServiceConfigurer clients)
this method configures the clients of our oauth2 resource, and clients in 90% of the cases in the world of oauth2 represents the 3rd party apps that want to access the resource owner data on his behalf (as example of that is when you allow a web or mobile application to access your instagram photos or facebook friends list)
B- configure(AuthorizationServerEndpointsConfigurer endpoints)
this method let you configure the oauth2 endpoints settings as: where to store the tokens, codes, and many other customizations that are usually not needed (the most important one is setting the token store)
3- Resource Server.java
here we can configure 2 important things
https://github.com/blabadi/oauth2lw-parent/blob/master/oauth2lw-core/src/main/java/com/bashar/oauth2lw/core/ResourceServer.java
1- configure(ResourceServerSecurityConfigurer resources)
this can allow us to configure the id of this resource server (becomes handy if we have multiple resource servers and we have access rules for different clients on each of them) and the more important config is the token store, i.e. where to verify the tokens that we receive in the requests and make sure they are authentic and created by our Authorization server.
2- configure(HttpSecurity http)
this is important and allows us to configure the urls that we want to protect under the oauth2 protocl in this resource, anything we specify here will require a valid token that can access this resource propery and in my default configuration i protected any api under the path /protected to be fully authenticated, now this is app specific configs because each app has its own apis and roles and security rules, so make sure you understand how to use the HttpSecurity builder
it worths mentioning the oauth2 spring libraries provide some exprissions like hasScope() and other security functions related to oauth2 security.
now how to use these classes?
you just have to add this jar in your deps in maven or gradle or whatever and import these 3 classes to your spring configurations, I have made an example in this client project:
https://github.com/blabadi/oauth2lw-parent/blob/master/oauth2lw-client/src/main/java/com/bashar/oauth2lw/client/Oauth2lwClientApplication.java
this is simple spring boot application and in it, just for practicing i overrode the method that configures clients in Authorization server and added my own client.. this can be converted to jdbc or whatever you want
and for the other 2 classes I haven't changed anything so I just imported them as is, if I haven't changed anything in Authorization server I would have also just imported it, but it will be scanned automatically since we extended it and annotated it with @Configration
and when we run the application and as for a protected (although non existing) url like :

so to get a token there are many flows but the more complex and more typical that we would use oauth2 for is authorization code flow, so to obtaina token go to the browser and type in :
http://localhost:8080/oauth/authorize?response_type=code&client_id=trusted1&redirect_uri=http://localhost:9090/redirect
this will redirect us to login page where this is similar to when you are redirected to facebook by a third party app to login and approve its permissions to get some of your data
so we login with our dummy in memory user setup in the spring security configs:

then you get the approval of scopes page

and if the user approves, then the server will issue an authorization code and return it to the 3rd party app on the redirect uri provided

the 3rd party server now should exchange that code with our server to an access token

after getting the token it can now use it to access the protected resoruce that we couldn't access before

Simple and clean and ready to be used out of the box just get the jar of the oauth2lw-core and drop it in your project and you will have oauth2 security ready.
note that the core lib pom already have the required deps:
so no need for you to worry about it..
Sunday, February 7, 2016
Meteor 101 - Simple scalable example - Part1
Meteor is fast growing java script framework that provides :
1- Rapid development, by writing less code
2- One Language everywhere (JS)
3- Reactive rendering html templates for single page apps
4- Single code for web & mobile
5- it has built in package management
6- Live clients, always connected [server push to clients instantly, through publish/subscriber]
and here is my first from scratch app using meteor.
I'll keep this short and cut to chase and I'll go in details when required
Source code here :
https://github.com/blabadi/meteor101-blog
you should first do:
1- install meteor
2- make directory for the project
A. Project skeleton:
navigate to the project directory and run
> meteor create meteor101
you will get 3 files and folder called .meteor
delete the 3 files and create the following dirs:

> server will contain server exclusive code - our security checks and authorization and where database is manipulated
> lib will contain common code, things that are shared between server and client, like collections
& router
Now the point of this app is to make a simple single page app, where u see list of departments and employees for each department (no css here - just tried to test bootstrap vertical navigation menu):

B. Project Data :
let's define our data model :
we need departments, employees, so in the lib directory we create collections.js file that contains :

and let's fill these with data initially.
in the server folder create [ bootstrap.js ] which is a file that contains stuff to do when the server start:
basically we insert departments and for each department we insert its employees connected togather with depId property.

ok now let's do some client stuff
A. General layout for application
in single page apps or other apps, there is usually common sections in the page that don't change like header and navigation menu and footer, so a good way to do that in meteor will need two things"
1- router, that will controll navigation between different templates and controls what to show and what to remove
2-a layout template to be used as general layout, this will always be displayed on the page, and it contains common sections and the place holder for the variable template to be shown.
to add our first template, under the client directory create folder : templates
and under that create main.html
set contents of the main app template to:

break down:
header part is for now simple static content
then we have the nav-menu div contains {{> nav}} which means render here another template called nav [will list its content next]
and the last div is the content, which will be specified by the router based on the url requested by the user [we will come to routing in next sections]
first let's create nav.html to make our navigation menu:

break down :
the template file only contains <template> , it's not an html page.
our menu is a simple <ul> tag with bootstrap css classes added
to add bootstrap to the project navigate to the project directory and run
> meteor add twbs:bootstrap
in the navigation menu we iterate over the departments (deps) and render them in list item <li>
and make them as links, and the value of the url to be evaluated by the router (comming next)
the text of this link is the department name
in case we are currently in this department page (it's selected, we add the active css class)
let's ignore the part related to the router and the selected if statement
first let's ask where will we get our data?
Meteor Tip:
each template has js helpers, that provide it with data and control it's variables.
so let's create nav.js under templates dir to control and provide this template with data:

note Template.nav (the 'nav' is comming from the <template name="nav">)
note 'deps' matches {{#each deps}} above
note we used Deps collection defined in collections.js
the 'selected' is a variable we defined that its value is a result of checking if the Session variable 'selectedDepartment' equals to the globally set _id (set by the router)
Meteor Tip:
Session is a global namespace to store variable used in the templates and it's a reactive storage, that means if it changes because of an event, then any template that depends on it will be re-rendered to reflect the new value.
ok so you're now saying what is the router, to create your router, under the lib directory create router.js
but before that execute :
> meteor add iron:router
Router:
In web frameworks a router is a module that handles mapping urls to pages..for example /department will display department.php, but here we are in a single page app, and we talk with templates, but we still want to have different urls when the user navigates, for example I want the home page to display a dashboard of all departments and all employees.
and when the user selects a department I want the url to look like this localhost:3000/department/{id}
to achive that in meteor we added iron router package.
now inside router.js add :

break down:
the first part is to tell meteor to use the template called 'main' as a general layout
the second line defines a route with name dash-board [we will define it next]
the template for that dash-board.html:

nothing fancy just static content
the third part is to define the department details.. the template for this route (dep-detail.html) is :

and the router here does two things :
1- defines url pattern (path)
2- provides the data to the template by extracting the _id from the url
3- sets the global selectedDepartment session variable that is used to determine which department
is selected in the nav menu above and assign the proper css class to it.
if we go back to the nav template above, we see that when we listed the departments that we refered to this route by name, and the router is smart enough to know that the _id needed in the path should be extracted from the department object in the nav template.
and the result url will be /department/{{_id}}
now in depDetails template we are using the data prepare in the router and displaying it.
and the other thing we do as well, is render a template called employees
that template contains :
employees.html

employees.js :

the important thing here to note is what this._id equals?
the employees template is rendered within the depDetails template, and the _id refers to the department that we are currently rendering.
now each employee is rendered in an employee template:

and this template gets its data passed from the employees template.
Read more here :
data contexts and templates :
1- https://www.discovermeteor.com/blog/a-guide-to-meteor-templates-data-contexts/
Routing :
2-http://meteortips.com/second-meteor-tutorial/iron-router-part-2/
3-https://www.meteor.com/tutorials/blaze/creating-an-app
1- Rapid development, by writing less code
2- One Language everywhere (JS)
3- Reactive rendering html templates for single page apps
4- Single code for web & mobile
5- it has built in package management
6- Live clients, always connected [server push to clients instantly, through publish/subscriber]
and here is my first from scratch app using meteor.
I'll keep this short and cut to chase and I'll go in details when required
Source code here :
https://github.com/blabadi/meteor101-blog
you should first do:
1- install meteor
2- make directory for the project
A. Project skeleton:
navigate to the project directory and run
> meteor create meteor101
you will get 3 files and folder called .meteor
delete the 3 files and create the following dirs:

Meteor Tip:> client folder will contain client exclusive code - logic/templates/views (pages)/css..
Meteor is a convention over configuration framework, for example specific names for folders in the project structure indicate something and where this code belongs to, and we will get to that.
> server will contain server exclusive code - our security checks and authorization and where database is manipulated
> lib will contain common code, things that are shared between server and client, like collections
& router
Meteor Tip:
Unlike other usual web frameworks, meteor share code between server and client and on each side that code is handled differently internally, that makes meteor capable to simulating the result of a server action without waiting for it to complete to make UI more responsive
Now the point of this app is to make a simple single page app, where u see list of departments and employees for each department (no css here - just tried to test bootstrap vertical navigation menu):

B. Project Data :
let's define our data model :
Meteor Tip:
Meteor currently uses Mongo db which is a non relational database that stores data in json format arrays and objects.
we need departments, employees, so in the lib directory we create collections.js file that contains :

Meteor Tip:
Collections in meteor are reactive, that means if they change they will trigger any watcher to recalculate, i.e. it will be re-evaluated and any html template that uses it will be re-rendered.
and let's fill these with data initially.
in the server folder create [ bootstrap.js ] which is a file that contains stuff to do when the server start:
basically we insert departments and for each department we insert its employees connected togather with depId property.

Meteor Tip :
Meteor.startup( ) can be used to do stuff on client side, but here it only executes on server because it's under server dir.
Meteor Tip:
By default meteor adds autopublish feature (package) for every new project, which means that clients will always be updated when any collection is modified by other clients or itself, this is good for prototyping but in real apps, we will use publish / subscribe to make sure we control data access correctly and not anyone can see all data.
ok now let's do some client stuff
A. General layout for application
in single page apps or other apps, there is usually common sections in the page that don't change like header and navigation menu and footer, so a good way to do that in meteor will need two things"
1- router, that will controll navigation between different templates and controls what to show and what to remove
2-a layout template to be used as general layout, this will always be displayed on the page, and it contains common sections and the place holder for the variable template to be shown.
Meteor Tip :
Meteor like other UI frameworks uses html templates to render pages, a Template is an html with place holders and simple logic to control the UI elements based on the data context that it owns.
Templates in meteor have this syntax :
<template name="employee">
<div>
your html between template tags
and place holders are like this
<span> employee name : {{name}}</span>
</div>
</template>
to add our first template, under the client directory create folder : templates
and under that create main.html
set contents of the main app template to:

break down:
header part is for now simple static content
then we have the nav-menu div contains {{> nav}} which means render here another template called nav [will list its content next]
and the last div is the content, which will be specified by the router based on the url requested by the user [we will come to routing in next sections]
first let's create nav.html to make our navigation menu:
break down :
the template file only contains <template> , it's not an html page.
our menu is a simple <ul> tag with bootstrap css classes added
to add bootstrap to the project navigate to the project directory and run
> meteor add twbs:bootstrap
in the navigation menu we iterate over the departments (deps) and render them in list item <li>
and make them as links, and the value of the url to be evaluated by the router (comming next)
the text of this link is the department name
in case we are currently in this department page (it's selected, we add the active css class)
let's ignore the part related to the router and the selected if statement
first let's ask where will we get our data?
Meteor Tip:
each template has js helpers, that provide it with data and control it's variables.
so let's create nav.js under templates dir to control and provide this template with data:
note Template.nav (the 'nav' is comming from the <template name="nav">)
note 'deps' matches {{#each deps}} above
note we used Deps collection defined in collections.js
the 'selected' is a variable we defined that its value is a result of checking if the Session variable 'selectedDepartment' equals to the globally set _id (set by the router)
Meteor Tip:
Session is a global namespace to store variable used in the templates and it's a reactive storage, that means if it changes because of an event, then any template that depends on it will be re-rendered to reflect the new value.
ok so you're now saying what is the router, to create your router, under the lib directory create router.js
but before that execute :
> meteor add iron:router
Router:
In web frameworks a router is a module that handles mapping urls to pages..for example /department will display department.php, but here we are in a single page app, and we talk with templates, but we still want to have different urls when the user navigates, for example I want the home page to display a dashboard of all departments and all employees.
and when the user selects a department I want the url to look like this localhost:3000/department/{id}
to achive that in meteor we added iron router package.
now inside router.js add :
break down:
the first part is to tell meteor to use the template called 'main' as a general layout
the second line defines a route with name dash-board [we will define it next]
the template for that dash-board.html:

nothing fancy just static content
the third part is to define the department details.. the template for this route (dep-detail.html) is :

and the router here does two things :
1- defines url pattern (path)
2- provides the data to the template by extracting the _id from the url
3- sets the global selectedDepartment session variable that is used to determine which department
is selected in the nav menu above and assign the proper css class to it.
if we go back to the nav template above, we see that when we listed the departments that we refered to this route by name, and the router is smart enough to know that the _id needed in the path should be extracted from the department object in the nav template.
and the result url will be /department/{{_id}}
now in depDetails template we are using the data prepare in the router and displaying it.
and the other thing we do as well, is render a template called employees
that template contains :
employees.html
employees.js :
the important thing here to note is what this._id equals?
the employees template is rendered within the depDetails template, and the _id refers to the department that we are currently rendering.
now each employee is rendered in an employee template:
and this template gets its data passed from the employees template.
Read more here :
data contexts and templates :
1- https://www.discovermeteor.com/blog/a-guide-to-meteor-templates-data-contexts/
Routing :
2-http://meteortips.com/second-meteor-tutorial/iron-router-part-2/
3-https://www.meteor.com/tutorials/blaze/creating-an-app
Sunday, January 24, 2016
Spring Data very simple example with Postgres
Hi Folks
Today it's again about server technologies and data persistence, but with spring-data project. This project aims to eliminate boilerplate code required to create the data tier, and not only that,
it also eliminate the code required by ORMs like hibernate to manage session and entity manager and everything we used to do to persist our data. enough talking.
technologies used :
a- spring data
b- spring mvc for simple rest api
c- hibernate as JPA provider
d- gradle for build management
e- ide of your preference, I used intellj in this one.
d- postgres as db
1- Business as usual we need a simple project structure, I'll keep it simple but scalable :

spring-data-sample (contains gradle root stuff: build, settings)
|
------ bl : data and business tier, merged together as we don't have any code for data!
|
------ web : where we expose bl with rest apis
2- setup the database, and by that you only need to install postgres and prepare the database, I created one called 'cars'. hibernate will fill it for us.
3- Business layer

in build.gradle you need these dependencies :
annotations :
@EnableJpaRepositories : scans where our repositories are (i'll get to define what a repository is)
@EnableTransactionManagement: allows you to use @Transactional,
a- data source : db connection
b- entity manager factory : for ORM to work, scans entities and defines hibernate properties
responsible for managing sessions and entities and all that ORM stuff.
d- transaction manager
and for our entity, nothing new, just a simple pojo with persistence annotations
now the fun part, all you have to do to get default crud operations is this:
out of the box you will get the following:
1- save (create & update)
2- delete
3- find, findAll, findByColumnXAndColumnY...etc
and to use it we have CarBo as a BL bean :
and the rest is the web part I'll leave it to you to check in the repository. https://github.com/blabadi/spring-data-repo Good Luck !
Today it's again about server technologies and data persistence, but with spring-data project. This project aims to eliminate boilerplate code required to create the data tier, and not only that,
it also eliminate the code required by ORMs like hibernate to manage session and entity manager and everything we used to do to persist our data. enough talking.
technologies used :
a- spring data
b- spring mvc for simple rest api
c- hibernate as JPA provider
d- gradle for build management
e- ide of your preference, I used intellj in this one.
d- postgres as db
1- Business as usual we need a simple project structure, I'll keep it simple but scalable :

spring-data-sample (contains gradle root stuff: build, settings)
|
------ bl : data and business tier, merged together as we don't have any code for data!
|
------ web : where we expose bl with rest apis
2- setup the database, and by that you only need to install postgres and prepare the database, I created one called 'cars'. hibernate will fill it for us.
3- Business layer

in build.gradle you need these dependencies :
dependencies { compile 'org.springframework.data:spring-data-jpa:1.9.2.RELEASE' compile 'org.hibernate:hibernate-entitymanager:4.2.6.Final' compile 'org.postgresql:postgresql:9.4-1200-jdbc4' }and for the configuration :
annotations :
@EnableJpaRepositories : scans where our repositories are (i'll get to define what a repository is)
@EnableTransactionManagement: allows you to use @Transactional,
a- data source : db connection
b- entity manager factory : for ORM to work, scans entities and defines hibernate properties
responsible for managing sessions and entities and all that ORM stuff.
d- transaction manager
and for our entity, nothing new, just a simple pojo with persistence annotations
now the fun part, all you have to do to get default crud operations is this:
out of the box you will get the following:
1- save (create & update)
2- delete
3- find, findAll, findByColumnXAndColumnY...etc
and to use it we have CarBo as a BL bean :
and the rest is the web part I'll leave it to you to check in the repository. https://github.com/blabadi/spring-data-repo Good Luck !
Friday, September 11, 2015
My first CSS 3 animation - somet
It has been a while...
but here is a quick post I'm trying to learn CSS3 animation and this is the first thing I tried out :
https://jsfiddle.net/sedfL89d/
but here is a quick post I'm trying to learn CSS3 animation and this is the first thing I tried out :
https://jsfiddle.net/sedfL89d/
Saturday, January 10, 2015
Android - Multiple themes for one application
Sometimes you want to have multiple themes for your app
4- go to the icon image view and change the src attribute to this

This procedure can be done not just for icons, you can define as many style attributes as you need and use them to make your theme dynamic instead of hard coding the values in your layout files.
and to change the theme dynamically you can store the user preferred theme in preferences and in every activity you have to do something like this
That's the basics you need to know to multi-theme your app.
one strong example is having the ability to switch between dark and light themes because during night, a white bright screen can really be annoying for users eyes


Android will do most of the work for you but it may be required to change icons between themes to fit colors
In this blog I'll show a simple app with both dark and light themes and how to change icons without having to do that from code and keep things clean and centralized.
first of all let's create our activity, it will look something like this :
In /rest/values/styles.xml, we inherit Theme.AppCompat
<!--
Base application theme, dependent on API level. This theme is replaced
by AppBaseTheme from res/values-vXX/styles.xml on newer devices.
-->
<style name="AppBaseTheme" parent="Theme.AppCompat">
<!--
Theme customizations available in newer API levels can go in
res/values-vXX/styles.xml, while customizations related to
backward-compatibility can go here.
-->
</style>
<style name="AppTheme" parent="AppBaseTheme">
</style>
This is the default and this is Dark theme..now if we want to add a Light theme, add this to styles.xml
<style name="AppTheme.Light" parent = "Theme.AppCompat.Light">
</style>
in the activity designer now we can view the new AppTheme.Light
As you can see most of the stuff was handled by android, but the email icon is not suitable for this light theme.
to make things dynamic, we do the following steps.
1- in /res/values add the file : attrs.xml if you don't have it.
2- add the following section
<?xml version="1.0" encoding="utf-8"?>
<resources>
<declare-styleable name="dynamic_style_attrs">
<!-- icon src attribute -->
<attr name="emailIcon" format="reference" />
</declare-styleable>
</resources>
3- in styles.xml, change the following :
<!-- Application theme. -->
<!-- Dark theme -->
<style name="AppTheme" parent="AppBaseTheme">
<!-- All customizations that are NOT specific to a particular API-level can go here. -->
<item name="emailIcon">@drawable/ic_action_email</item>
</style>
<!-- Light theme -->
<style name="AppTheme.Light" parent = "Theme.AppCompat.Light">
<item name="emailIcon">@drawable/ic_light_email</item>
</style>
4- go to the icon image view and change the src attribute to this
<ImageView
android:id="@+id/imageView1"
android:layout_width="32dp"
android:layout_height="32dp"
android:src="?attr/emailIcon" />
that's it, let's test and see how the light theme will look now:
This procedure can be done not just for icons, you can define as many style attributes as you need and use them to make your theme dynamic instead of hard coding the values in your layout files.
and to change the theme dynamically you can store the user preferred theme in preferences and in every activity you have to do something like this
@Overrideif you don't call this android will use the default theme in AndroidManifiest.xml
protected void onCreate(Bundle savedInstanceState) {
if (SELECTED_THEME.equals("LIGHT")) {
setTheme(R.style.AppTheme_Light);
}
super.onCreate(savedInstanceState);
setContentView(R.layout.activity_main);
}
That's the basics you need to know to multi-theme your app.
Subscribe to:
Posts (Atom)
Istio —simple fast way to start
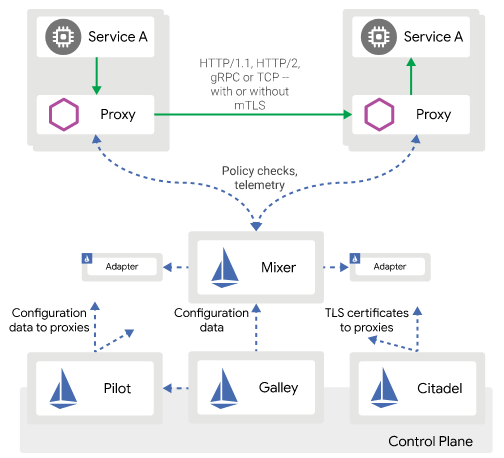
istio archeticture (source istio.io) I would like to share with you a sample repo to start and help you continue your jou...
-
 So RecyclerView was introduced to replace List view and it's optimized to reuse existing views and so it's faster and more efficient...
 -
 In this blog I want to introduce something I've been working on for a while last month, it's a java, spring boot 2, microservices ap...
 -
 So now it's time to test our configuration live! we will need an apache tomcat server and mysql db server, I'll use tomcat 7 and w...