Sunday, November 4, 2018

[PART 5] NuTracker ReactJS app - Add Login & Profile using Router


In the previous part we finished the dashboard read functionality, now we want to add the skeleton for other pages:

- Login
  In this page the user will be able to login to their account and the dashboard won't show unless the user is logged in.

- Profile
In this page the user will be able to update their daily nutrition goals that they can track in the dashboard.

to be able to have multiple 'pages' in react and navigate from one to one, we need something that can switch the rendered content based on what we want, we can do that with if statements in the App components and store some location state, but why invent the wheel.

React Router


every major single page app web framework has the routing concept and functionality to interact with the usual browser urls and switch the content based what user should see.

for example on the profile page I want the url path to be /profile, and for login to be /login and so on.
in more advanced cases you want the users to be able to bookmark a page and be able to get back to that page with state they left it on and that is tricky in single page apps because as in our case we deal with state which doesn't read anything from url and everything is just stored in browser memory.


for this PR I only added the navigation and authentication protection of dashboard & profile using react router, in future we can try to do something like making the date be a url parameter so users can bookmark specific dates in their dashboard.

here is the core lines that hold the routing logic (see routes.js)


everything added to enable router is in this PR, and I commented on the PR changes to explain each change.

Things to note


1- React Router manages its own state, it's not managed by redux

Yes things can get a bit messy because now we have two different sources of state and this means if we want a button to udpate the url and pass filters for examples (like the date navigation) then we need to let our components to read that from router state and not from the redux stored state.

there is a library that synchronizes redux and router called connected-react-router

more about this here:
- https://reacttraining.com/react-router/core/guides/redux-integration
- https://redux.js.org/advanced/usagewithreactrouter


2- we can check authentication and decide to either redirect to login or allow and render the component by adding custom PrivateRoute component (see routes.js), see also how the login page will redirect back to the referrer (the page the user tried to access before they were redirected to login)


how the app looks right now:

the dummy login page:


our lovely dashboard:


and our dummy profile page:


In the next part I'll be covering PropTypes and how to write unit tests for components then we can add our first form to allow the user to add entries to their day.

Wednesday, October 31, 2018

[PART 4] NuTracker, ReactJS application - Finish Dashboard Read functionality

In the previous part we added the first call to the async api to do search, now we will build on that to call more apis, and to add more components on the page to finish up the Display flows (i.e. what doesn't require writes / forms) :
  • search
    • this allows the user to find a specific food and choose to add an entry for it to their day to record that they consumed a specific portion of that food.
  • show entries
    • This feature is to allow users to see what they recorded as a list of entries, each entry represents a food the user added on a specific date.
  • show progress bars
    • The user will be able to set goals like how many calories, proteins, fats they want to consume daily and these bars will calculate from the entries they added how close they are to their daily goals
  • reload entries & progress metrics when date change 
    • This is to provide the ability for the users to go back in history and see their entries.

all this is in general similar to the steps I did before:
- add presentation component
- add add actions (api calls or anything else) & reducers ( store the responses in the state and calculate new state if the date changed for example )
- add container component to pass the props to the presentation


all the code for this day is in this pull request ( so you can check exactly what was added and changed), I have also added comments on some files there to explain a little bit.
It's easier to see and navigate files in the "Files Changed" tab in Github PR page


Things Worth noting


 Components Interaction


Up to this point the dashboard didn't have any interaction across components
but in this PR I added the Date navigator which when a user navigates in one direction should load the Entries they created for that new Date they are on, I addition the progress metrics should update according to the new entries.
the way I did this was :
1- when dashboard first loads it just loads the current day information, so the entries list component will  (in componentDidMount) and fetch today's entries).
2- if the user go back in date navigator that triggers a redux action (PERIOD_CHANGED, see dateNavActions.js)
3- the period reducer will update the state with the new start/end dates
4- Our DayEntries component uses state.period as props, so when the state changed because of the date navigation action above, our component will be rerendered.
5- since this is a rerender and not mounting, we have to use the componentWillReceiveProps life cycle method to trigger a new redux action to fetch the entries for the new date period.


 Introducing RequestBuilder

this class is a helper to be used by the repos to inject headers and parse reposne as json, this saves us from repeating this logic everywhere.

Adding User info to state

Since we now want to show progress bars about user goals, I added an api call through userRepo to get the user profile from backend (see Dashboard component), there was no login needed because I hardcoded the user token in the request builder, this way we have real user information without being blocked on login being ready to do this work but in the same time we deal with real data model of the user.


In the next part I plan to :
1- create a dummy login page
2- use react-router to have multiple pages in our app (login, dashboard, profile) each with it's own url


Friday, October 19, 2018

Using Windows 10 built in bash to ssh to ec2 instance

Using Windows 10 built in bash to ssh to ec2 instance


detailed steps to install bash on windows here: https://www.thewindowsclub.com/run-bash-on-windows-10

Summary:

0- enable windows subsytem for linux
1- open cmd
2- type bash
3- accept and create a unix user account
4- wait to finish
6- you may need to reboot

reopen cmd and type bash, you should see your cmd prompt changed.

5- to ssh to ec2 you need .pem key file that you download when you create the instance
6- copy that file under /home or something else but not under /mnt/* (windows files) because the next step will not work, the file has to be in a linux directory (bash in windows can't change windows files permissions)
7- we have to run this command :
$ chmod 400 pem_file.pem
because otherwise you will get an error that this key permissions are too open (not secure enough).
8- the command is ssh -i "pem_file.pem" ec2-user@123.456.897  (replace the pem file name and ip with your values).

now you can connect from windows terminal without ssh client/PuTTy  and this bash can be used for other bash command and tools like telnet etc.. fun :)

Tuesday, October 9, 2018

Online IDE stackblitz.com :)


I stumbled upon this neat online IDE, where you can :

- instantly start, share and run code
- use npm dependencies and install what you need quickly
- you can drag drop files from your computer
I'm yet to explore it but seems very promising

it also has a neat feature to embed itself in blogs like this one so that's awesome because now I can show live examples of running code and share them with my readers !

all I had to do is include an iframe with url to my test project on their website

this is an example of a react project   :)


Kudos to the people who create this cool stuff and share with us !

Saturday, October 6, 2018

Gensim NLP and TF-IDF document search example


In this blog I'll try to use an NLP (Natural language processing) library to get to:
- know some basic concepts and
- try to search a data set of books metadata (author, title, summary) to respond to user query

Setup
 you need:
- Anaconda (python environment management tool), get it here
Anaconda works by creating an isolated installation of python with the packages needed and it won't affect other environments so you can run different versions of python and other python libraries without conflicts
- code: https://github.com/blabadi/gensim-books

- setup the environment (in shell window or in anaconda prompt) run:
conda create gensim_env python=3.5 gensim nltk jupyter
this will install the packages needed
- navigate to the code directory, run:
jupyter notebook

this will open the server web page and you can select the notebook that we need now : gensimWord2Vec

Code
https://github.com/blabadi/gensim-books/blob/master/gensimTFIDF.ipynb

Saturday, September 15, 2018

[ Part 3 ] First Async call, redux-thunk


Previous Part (adding redux): http://dev.basharallabadi.com/2018/09/part-2-nutracker-reactjs-application.html

By default the store only understands object dispatched actions, i.e. it won't support async calls out of the box neither functions, which conflicts with our need to call an api asynchronously and get the results and returns those results to our reducers to update the state.


Redux Thunk

The simplest approach to achieve what we need is to use something called middleware in redux that can pre process our actions and then proceed to the store when it's done.
Redux thunk is a middleware library that knows how to handle a function received as a dispatched action from a component then based on the result it can dispatch more actions to the store to notify our reducers with the results.
mainly we use it to process async calls and based on the result (success/fail) we ask it to dispatch the proper actions when.

First lets update our foodRepo to actually call an api:
- install corss-fetch npm install --save cross-fetch to use the fetch API and get promises for our async calls.
- renamed the mock method in foodRepo to findFoodMock(), and created new one for the real call which does a fetch call to our api and parse the json body.
- I added this in the package.json: `proxy": "http://localhost:8080` to avoid Cross origin errors so react will proxy requests to this server through the development server.

findFood(name) {
return fetch(`/api/food/search?name=${name}`)
.then(response => response.json());
}

Actions Change

was:

export const SEARCH_FOOD = 'SEARCH_FOOD';
export function searchFood(term) {
 console.log(`in searchFood ${term}`);
 return {
  type: SEARCH_FOOD,
  term
 }
}
Let's change our actions to make an async call, we need two actions  :
- one to declare the call has started (so components can render loading spinner for example)
- another one to handle the result of the call
we already have SEARCH_FOOD action but now, it will now be used to:
- notify the reducers that the call started instead
to send the ajax call we will introduce a new function (fetchFood) that will:
- invoke the ajax call and host the logic to handle the promise result
- dispatch SEARCH_FOOD
the way we will handle the ajax call result is by dispatching a new action with the result as payload:
 RECEIVE_SEARCH_FOOD_RESULTS
after changes:

Reducers

modifed my reducers as well:
- if the action is SEARCH_FOOD it will set a flag that we are fetching data
- if the action is RECEIVE_SEARCH_FOOD_RESULTS, we will handle the results for that term, and update the state with the results array and unset the fetching flag.

what changes on the component side?

Previously in FoodSearch.js we dispatched the searchFood() action creator result (what builds SEARCH_FOOD action payload )
- the dispatch(searchFood(term)) will change now to dispatch(fetchFood(term))
- this new action creator returns a function that takes dispatch as parameter (to use it later on)

but as we said earlier: the store doesn't understand function actions by default and if you run the app now you will get this error message
Error: Actions must be plain objects. Use custom middleware for async actions.
so we will:
- install redux-thunk run npm install --save redux-thunk
- modify our store creation logic:
import thunkMiddleware from 'redux-thunk';
// lines omitted...
const store = createStore(rootReducer, applyMiddleware(thunkMiddleware));
- running the code will show results from server.

Source for day 3: https://github.com/blabadi/react-nutracker/tree/day3/async-api-call
references: https://redux.js.org/advanced/asyncactions

Thursday, September 13, 2018

[ Part 2 ] Nutracker, ReactJS application - Adding Redux

In the first part we covered how to create components and
how to interact with a mock api to get data for our application.

all of that can be enough to build a react app but it won't scale well
for the following reasons:
1- state will be all over the place  in different container components which means we have to add more layers of components to share common parts of states.
2- the propagation of events can be hard to deal with when the components tree gets deeper and other components (siblings and their children) will probably need to be notified of state changes.


Redux data flow

so there is a library called redux, and redux-react.

this library in simple terms facilitates dispatching application wide events to specific handlers (reducers) that modify the state based on the actions they receive, it then store the whole state after those handlers change it and pass the new state to react framework to rerender our components.
In short: it's an event publish/subscriber tailored to manage a state object.

it worth mentioning that redux itself can be used to manage any state, not only react (state is just a JS object at the end of the day) but redux-react adds helper functions and saves you from writing some boilerplate code that we will see soon.

Part 2 code 

https://github.com/blabadi/react-nutracker/tree/01f265a10363a73f359e45db917306be0e1d6efc


Directories added (to organize but not needed):
- actions
- reducers
Renamed:
components => presentational (not related nor needed to redux)

To think the redux way, we have to look at what our component raise for events
currently we have searchBox on term change, this can be translated to a redux 'action' called SEARCH_FOOD.
Actions have to be objects (by default) and to distinguish each action, we give it a type property which is unique string across the app, they also hold any other properties as needed.
So we want our searchBox to send (dispatch in redux terms) a SEARCH_FOOD action to trigger a call to the mock api and fetch foods that match the user query.

Note that our presentation component (SearchBox) won't change in anyway because it was designed not to need so (see part 1 for details).
 Only our container components will change 
from:
 - managing state locally 
 - being responsible to fetch the data by calling the external api (handle events)
to: 
dispatch actions and receive new state

for the first action it will look like this:

the action is just an object, the function that creates that object is called an action creator.
in our case, it takes term as an argument and returns a simple object .
the SearchBox dispatches that action by using the method: dispatch passed to it from redux store
A lot has changed in this component it no longer has any of the react related code, and the reason is:
that it is now created for us by redux using the connect() helper method from redux-react library.
 
The moment you start using redux our container components become unnecessary to be created manually (repetitive boilerplate code) as they will just have one variant in the code , which is to tell redux what to dispatch on each event (mapDispatchToProps), and how to read the state and pass it to child presentation components (mapStateToProps).

without using the connect utility method we will need something like this

class FoodSearchBox extends Component {
  onTermChange = (term) => {
    store.dispatch(searchFood(term))
  }
  render = () => {
     return <SearchBox  ...
            onTermChange = {this.onTermChange}
            results={toResults(store.getState().searchFoodResults)} />

  }
}

The next question if you look at the code above is where did state.searchFoodResults was created ?
the answer is: in the reducer.

A Reducer is a function that receives (state & action) and returns a new state calculated from the action.

for our case here this is our reducer:


it took the state and if the action is SEARCH_FOOD we filled the state with the mock data.
and returned the new state.

few notes:
- Reducers has to be pure functions (no api calls, no database calls nothing that is not a pure js objects manipulation), in this example I did call foodRepo in the reducer but that's just because it's mock data call, not actual network call, but we will change this next part.
- combineReducers is a method from redux that you pass it all the reducers you have and it will build the state tree out of these. (it's good practice to split reducers based on parts of the state each handles, and not have one gigantic function). if we say want to store user information in the state, we would do so by having a reducer like this :
const user = (state = {}, action) => { ... }
and our state will look like this:

  user: {}, 
  searchFoodResults: [] 
}
and so on, Redux will use the keys (in combineReducers) to build the state and it will also pass that part of the state to that reducer to let it focus on that part of the state so our user reducer will only get a reference to: state.user and not a reference to the whole state tree.

So by now our app hasn't changed functionality wise, but internally it changed a lot, and this is a needed foundation to scale it for a bigger state and more interactions across components.

In the next part I'll explain how we can get rid of the mock data and do an actual async ajax call to an api that will return foods and what will need to change to handle the asynchronous  call.

for more details:
https://redux.js.org/basics/

Istio —simple fast way to start

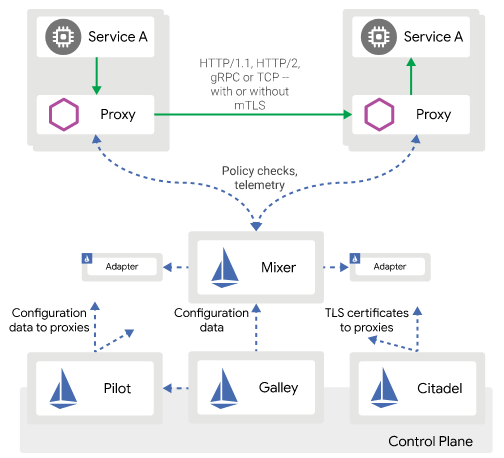
istio archeticture (source istio.io) I would like to share with you a sample repo to start and help you continue your jou...